
TL;DR — Layering in the transitional season
- The "maximum three layers" rule is too crude. How many layers you can wear depends on your scale, not on a number.
- Volume is a budget. Every layer draws from it — three thin layers cost less than two thick ones.
- Stagger your hems, never bunch them. Three cut lines at one height read as a block, not a silhouette.
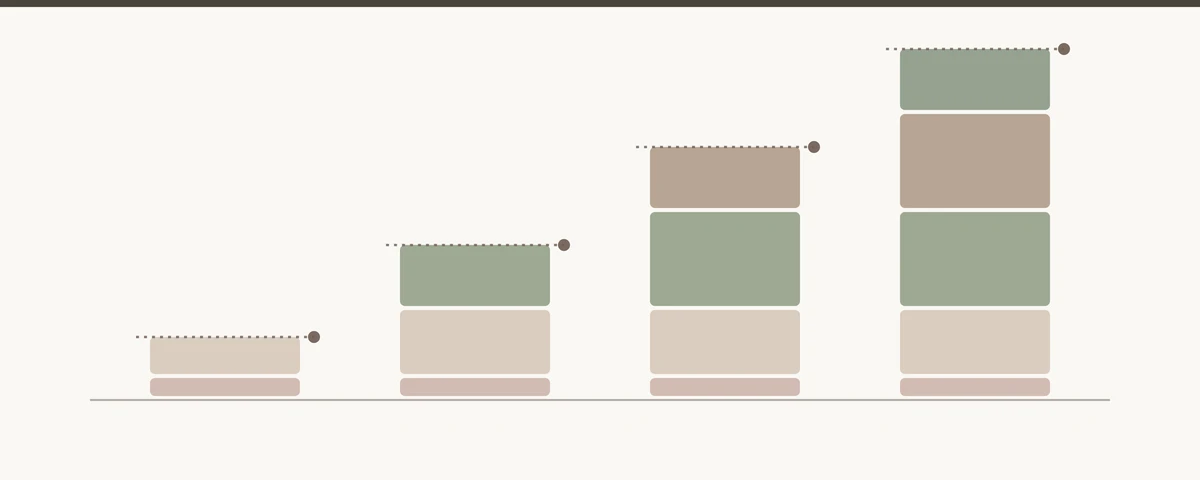
- Warmth is calculable: the clo value. T-shirt 0.08 · thin knit 0.25 · thick knit 0.36 · light coat 0.36.
- The innermost layer decides whether everything above it hangs cleanly.
Layering in the transitional season works through three quantities: how many layers your silhouette can carry, where their hems end, and how much warmth each layer actually delivers. It is not the number that decides, but the ratio of volume to body line. Three thin layers can look slimmer than two thick ones — and a single badly placed hem tips the whole proportion.
Almost every guide on the subject stops at "maximum three layers" and "play with proportions". That is not an instruction, that is an observation. This guide does the arithmetic instead: with your volume budget, with hem heights, and with a unit of warmth that never appears in fashion magazines.
Contents
- What layering actually solves
- The volume budget
- How many layers can your figure carry?
- Cut lines: where each layer may end
- Warmth in numbers: the clo value
- The layering order in six steps
- The neckline stack
- Colour and fabric
- Layering by body shape
- The most common mistakes
- FAQ — Common questions
What layering actually solves
Layering is the deliberate wearing of several visible garment layers that can be removed one at a time. The term describes a principle, not a style — the same one hikers call the onion principle.
The problem of the transitional season is not the cold. It is the range. A September day starts at 8 °C and reaches 19 °C by midday; an April morning in the shade feels like February and the noon sun like May. The German Weather Service lists daily swings of more than ten kelvin as normal in these months. A single thick garment cannot respond to that — it is either too warm or too cold, for half the day at a time.
Several thin layers solve it because air sits between them. Those pockets of air are the actual insulator, not the fabric. That is why three thin layers often warm better than one thick one of the same total weight — and why warmth can be fine-tuned by opening or removing a single layer.
The fashion part comes afterwards. When layers sit visibly on top of one another, they create additional lines, edges and blocks of colour on your body. Those are what decide whether the look holds together or falls apart.
The volume budget
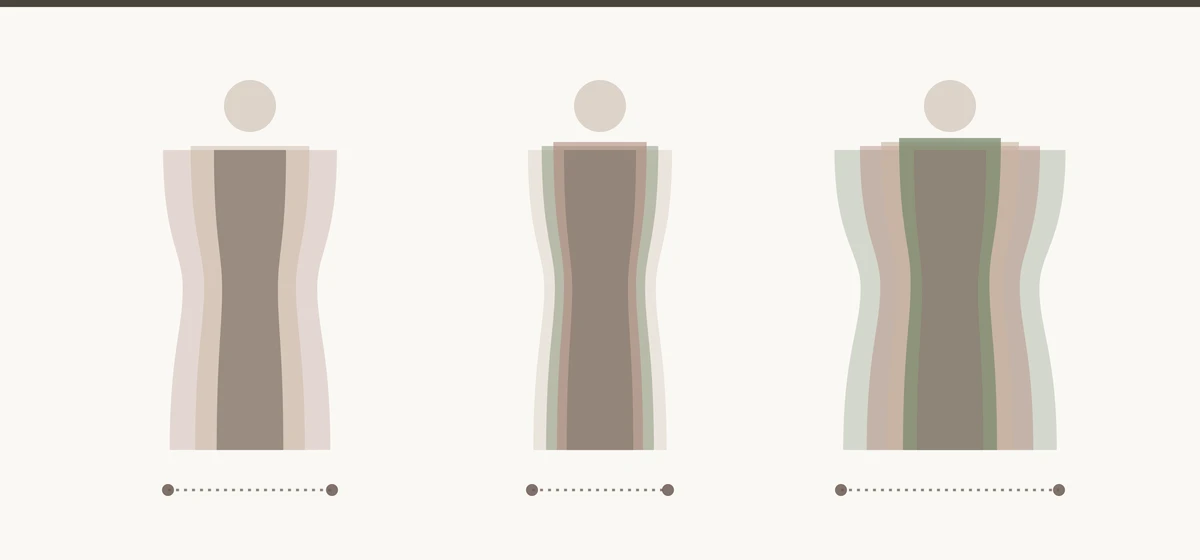
The volume budget is the amount of additional space your silhouette can absorb before it loses its recognisable shape. Every layer draws from it. How much depends not on the number of layers but on their thickness.
Do the rough sums once: a chunky knit adds roughly 2 to 2.5 centimetres per side, a quilted gilet about the same. Two such layers make around 5 centimetres per side, so a good 10 centimetres of extra circumference. A fine long-sleeve, a light knit and an unlined overshirt together come to about 3.5 centimetres per side — with one layer more.
It is not the number of layers that adds width, but their sum. Three thin layers are narrower than two thick ones — and more adjustable as well.
From this follows a rule that appears in none of the usual lists: spread your budget across more but thinner layers. You gain temperature range and lose no contour. Combine two bulky pieces instead and you get the same warmth, less adjustability, and more width.
Where the volume sits matters just as much. A quilted gilet places all of its volume on the torso and leaves the arms slim — that creates contrast. An oversized knit spreads it across torso and arms at once and widens the whole upper body. Both can be right, but not for the same figure.
How many layers can your figure carry?
The wearable number of layers follows from your scale — that is, height and bone structure together. A petite frame has a smaller volume budget than a tall, sturdy one. The blanket "rule of three" treats both the same and is therefore wrong for both.
If you do not yet know your starting point, settle that first: what body shape do I have answers the question in four measurements.
Small or delicate scale
Two to three layers, all thin. The reason is arithmetic: at 160 cm, every additional centimetre of width is proportionally more than at 178 cm. Keep the outermost layer short or narrowly cut and avoid coarse textures directly on top of each other. More on this in the guide to styling for petite women.
Tall or strong scale
Three to four layers, happily in coarser materials. A tall figure can absorb volume without the proportion tipping — and too little volume quickly looks thin here. Chunky knits, substantial wool fabrics and long, falling outer layers all work.
Curvy figure
Fewer layers, worn open. A fully closed stack piles volume onto curves that are already there. An open long outer layer, by contrast, creates two vertical lines at the torso and leaves the middle free — the single most effective trick in this whole category. How vertical lines work is covered in detail under looking visually slimmer.
Straight, slim figure
Here volume is a design tool rather than a risk. Three to four layers with different textures build the shape the figure does not bring by itself. A belt over the middle layer sets a waist where there is no pronounced one.
Cut lines: where each layer may end
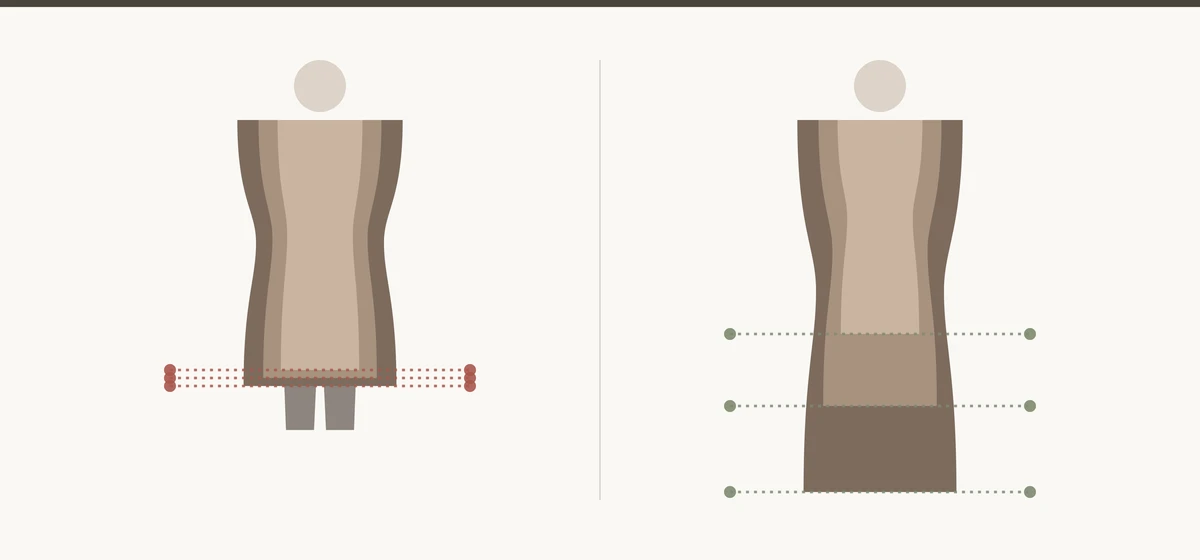
A cut line is the horizontal line every hem draws across the body. A single-layer outfit has one. A layered look has three or four — and each one pulls attention to its own height.
From this follows the second rule most guides omit: keep at least eight to ten centimetres between any two hems. Closer than that and they merge visually into one broad band. This is exactly what makes layered looks appear "messy" without anyone being able to say why.
Three hems at one height create no rhythm, only a block. The spacing is the design.
Usable landing points from top to bottom: the waist, the high hip, the top of the thigh and mid-thigh. Avoid letting an edge end exactly on your widest point — the same logic applies to short jackets and to the coat.
The longest layer is a special case. It should end either clearly above or clearly below the knee, never exactly on the kneecap. At knee height the edge cuts the leg into two nearly equal halves, and equal segments read shorter than unequal ones.
Warmth in numbers: the clo value
The clo value measures how strongly a garment insulates — 1 clo equals 0.155 m²K/W. The unit comes from clothing physiology and is standardised in ASHRAE Standard 55 as well as ISO 7730 and ISO 9920. A value of 1.0 clo corresponds roughly to what a person at rest finds comfortable at 21 °C indoors.
What makes this useful: the clo values of individual garments can be added together. That turns the gut feeling of "this should do" into a calculation. The values below come from the standardised tables; they are guide figures for standard cuts.
| Garment | clo | Role in the layered look |
|---|---|---|
| T-shirt | 0.08 | base, almost no warmth — pure smoothing |
| Blouse / shirt, thin long-sleeve | 0.25 | base with a visible collar and hem |
| Fine knit / thin jumper | 0.25 | middle layer, best warmth-to-volume ratio |
| Chunky knit / thick jumper | 0.36 | plenty of warmth, but expensive in the volume budget |
| Sweatshirt | 0.34 | middle layer, hard to shape |
| Trousers, thin | 0.15 | base below |
| Trousers, thick | 0.24 | base below for colder days |
| Coat, single-breasted thin | 0.36 | outer layer, wearable open |
| Coat, single-breasted thick | 0.44 | outer layer for the winter edge of the season |
Three worked examples for the transitional season:
- Mild day, 15 to 18 °C: T-shirt (0.08) + thin trousers (0.15) + fine knit (0.25) = 0.48 clo. Roughly classic summer indoor clothing — enough outdoors while moving.
- Cool day, 10 to 14 °C: blouse (0.25) + thick trousers (0.24) + fine knit (0.25) + thin coat (0.36) = 1.10 clo. That sits above typical winter indoor clothing of 1.0 clo — right for standing and walking outside.
- Cold edge, 5 to 9 °C: long-sleeve (0.25) + thick trousers (0.24) + chunky knit (0.36) + thick coat (0.44) = 1.29 clo.
The figures are not precision measurements — cut, fit and wind change them considerably, and a validation study of the ISO 9920 summation method shows that adding values scatters for multi-layer systems. As a yardstick between two planned outfits they are still more useful than any feeling.
The layering order in six steps
The order is not a matter of taste. Every position has a job, and a layer in the wrong place sabotages the one above it.
- Innermost layer: smooth and narrow. It determines how everything above it hangs. A bulky piece right at the skin pushes every further layer outward. Fine jersey, thin cotton, smooth viscose.
- Second layer: the warmth. This is where most of the insulation sits — fine knit, thin jumper, sweatshirt. This layer may sit close to the body but should not strain; a stretched knit loses its air pockets and with them most of its warming power.
- Third layer: the shape. Gilet, cardigan, overshirt or blazer give the stack structure. This layer decides whether the look reads as considered or thrown together.
- Outer layer: it hangs, it does not strain. The coat must close over everything beneath it without horizontal creases forming. If it only fits open, it is one size too small for this build-up.
- Check the hem heights. Stand in front of the mirror and look for the horizontal edges. If two sit closer than a hand's width, swap one length.
- Movement test. Raise your arms, sit down, take the stairs. A layered look that only works standing still does not work — this is exactly where combinations of a too-tight outer layer and a too-thick middle one fail.
The neckline stack
Necklines lying on top of one another form a new shape together. This is the most overlooked point in layering: it is not the individual neckline that counts, but the figure they all make jointly.
Three constellations work reliably:
- Staggered deep: V-neck over crew neck over shirt collar. The openings grow wider outward and the eye follows a clear line downward.
- Closed high: roll neck under an open outer layer. The closed neck becomes the fixed point, the open front supplies the vertical.
- Collar over collar: shirt collar over knit, coat lapel above. Needs room — with a short neck this gets crowded quickly.
What does not work: two crew necks of almost the same width on top of each other. They create a double ring at the neck that shows neither line nor intent. Which neckline suits your face and upper body is covered in the guide to which neckline suits me.
Colour and fabric
Colour controls whether the layers read as one look or as several garments. Two routes reach the goal, a third is a mistake.
Tone on tone is the safe route: all layers in shades of one family — cream, sand, camel, or charcoal, grey, blue-grey. The cut lines recede because no colour change emphasises them. For petite figures and curvy silhouettes this is the best choice.
Deliberate contrast is the more expressive route: light base, dark middle layer, mid-tone outer layer. Here you have to place the hem heights more precisely, because every colour change highlights one more edge. In return you gain depth.
The mistake is the accidental mix: three similarly strong but unrelated colours. The eye finds no order and reads the result as an accumulation. If in doubt, keep two layers in the same family and let only one break away.
For fabric there is a simple order: smooth inside, textured outside. Chunky knit under a smooth coat works; a smooth shirt over chunky knit does not, because the knit beneath pushes every crease upward. Materials with body — wool felt, dense cotton, leather — belong outside, because they hold their shape against the layers underneath. Fluid fabrics like viscose or silk belong inside, where they have room to fall.
Layering by body shape
Body shape determines where volume belongs. Scale determines how much. The two questions are answered separately.
| Body shape | Layering strategy | Avoid |
|---|---|---|
| A / pear | Build volume up top: knit, scarf, gilet. Outer layer open and falling straight. | hems at the widest point of the hip, gathered layers below the waist |
| V / inverted triangle | Keep upper layers narrow and smooth, shift volume downward. | chunky knit plus a quilted gilet across the shoulders |
| H / rectangle | Three to four layers with texture changes; a belt over the middle layer sets a waist. | everything equally smooth and equally long — no contour at all |
| X / hourglass | Few, narrow layers; leave the waist visible or emphasise it. | a wide, straight outer layer worn closed — it fills in the waist |
| O / round | Long, open outer layer for two verticals; put the warmth into thin layers. | closed bulky layering over the middle of the body |
If you want to build your wardrobe on few, combinable pieces in principle, the systematic route is under capsule wardrobe — layering is the technique that turns few pieces into many temperature ranges.
The most common mistakes
Innermost layer too thick. A chunky knit directly on the skin forces everything above it outward. The result looks inflated even though the number of layers is right.
All hems at one height. The most common reason a layered look "doesn't sit" without the wearer being able to say why. Eight to ten centimetres of spacing solves it.
The outer layer only fits open. A coat that no longer closes over the stack is worthless in the rain. Always buy the outer layer while wearing the thickest planned combination underneath.
Doubling the volume. Quilted gilet over chunky knit over wide trousers — width three times over. One of the three levels has to stay narrow; the same logic applies to choosing trousers.
Too many textures. Chunky knit, corduroy and quilting at once produce visual noise. One striking texture per look is enough; the rest stays smooth.
Forgetting the sleeves. Three layers on the torso and three on the arm means thick, immobile arms. Plan at least one of the layers sleeveless — which is why a gilet instead of a cardigan is such a reliable device.
In the mountains the same principle becomes a question of warmth rather than proportion: there the windproof outer layer decides more than any thickness. What the three layers look like on a winter holiday is covered in the guide to the après-ski outfit.
In the transitional season both seasons half apply — which is exactly when Zone 1 and Zone 2 of the wardrobe swap contents. How that changeover works is in the guide to organising a wardrobe.
FAQ — Common questions
How many layers are right for a layered look?
There is no fixed number. Delicate figures wear two to three thin layers, tall or strong ones three to four, also in coarser materials. What matters is the total width that results — three thin layers build less than two thick ones.
What is the difference between layering and the onion principle?
The onion principle describes the functional side: several layers that can be removed one at a time to regulate warmth. Layering means the same principle when the layers are deliberately left visible and styled. Technically identical, visually different.
Does layering make you look bigger?
Only if the volume is badly distributed. Every layer adds physically, but thin layers cost less than thick ones, and an open long outer layer creates two vertical lines that make you look narrower. It becomes critical when several bulky pieces sit closed on top of each other.
What is the right layering order?
From inside out: smooth narrow base, then the warming layer, then the shaping one, then the outer layer. The innermost layer determines how everything above it hangs — a bulky piece right at the skin pushes every further layer outward.
What should I wear at 10 to 15 °C?
You need roughly 1.0 to 1.1 clo. That corresponds to a blouse or long-sleeve, thick trousers, a fine knit and a thin coat. While moving, less is usually enough; standing still or in wind, rather more.
Why do my layered looks appear messy?
In most cases the hems sit too close together. Three cut lines within a few centimetres merge visually into one broad band instead of a staggered line. Keep at least a hand's width between two hem heights.
Which fabrics are suitable for wearing on top of each other?
Smooth, fluid fabrics inside such as fine jersey, thin cotton or viscose. Outside, materials with body such as wool felt, dense cotton or leather. Chunky knit belongs in the middle, never innermost and not under a smooth shirt.
How do I combine colours when layering?
Either tone on tone within one colour family — the cut lines then recede — or deliberate contrast with a light base, dark middle layer and mid-tone outer layer. Avoid three similarly strong, unrelated colours.
Does layering work for curvy figures?
Yes, with fewer layers and the outer layer worn open. A long, open jacket or coat creates two vertical lines at the torso and leaves the middle of the body free. Closed bulky layering over the waist, by contrast, adds bulk.
How do I check whether my layered look works?
Three tests: look for the horizontal hem edges in the mirror and check the spacing. Close the outer layer — if it strains, a layer beneath is too thick. Raise your arms and sit down; whatever pulls will not survive the day.