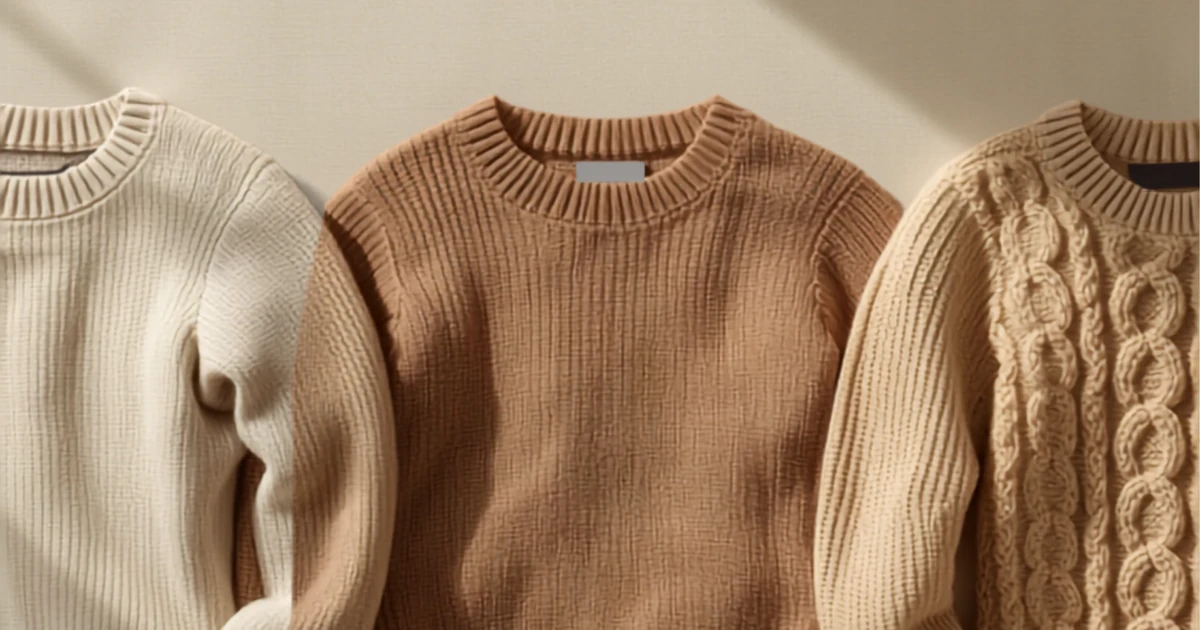

TL;DR — Which jumper suits my body shape?
- A jumper has no darts and no construction — the silhouette comes from the knit, not from the cut.
- Knit gauge follows bone structure: chunky knit brings visible mass of its own and overwrites fine bones. Fine knit shows the line underneath.
- The shoulder seam changes apparent shoulder width more than any neckline does.
- By default the hem lands on your widest point. That is exactly where it does not belong.
- Ribbing is the only structure a jumper has — it decides whether the piece blouses or clings.
Which jumper suits your body shape is decided first by the material and only then by the cut. A jumper has no darts, no interfacing, no button placket — nothing that forces it into shape. It takes the shape the knit gives it. That is why the usual question about necklines misleads: it answers the second most important thing first.
Jackets follow their own rules, and so does the blazer — both have construction, the jumper has none.
Contents
- Why a jumper works differently
- Knit gauge by bone structure
- The shoulder seam: the strongest lever
- The hem lands on your widest point
- Ribbing: the only structure
- The jumper shapes at a glance
- Necklines: what they actually do
- Jumpers by body shape
- Jumpers by body line
- The fit check in 6 points
- The most common buying mistakes
- FAQ — Frequently asked questions
Why a jumper works differently
A jumper is a garment without construction. Blouses, blazers and jackets are pushed into a shape by darts, interfacing and seams — a shape they keep even off the body. A jumper has none of that. It hangs, drapes or stands, depending on how tightly the stitches sit and how heavy the yarn is.
From that follows the practical rule of this guide: with a jumper the material decides the silhouette, not the cut. Two jumpers made from an identical pattern look completely different on the same person if one is fine merino and the other thick lambswool in a chunky gauge. One follows the body line, the other builds its own.
With a blazer you buy a shape. With a jumper you buy a material, and the shape follows from it.
That is why gauge comes first in this guide and the neckline comes last. It is deliberately the reverse order of most advice — and it leads to better purchases.
Knit gauge by bone structure
Knit gauge is the visible thickness of the stitch pattern — from fine knit, where the individual stitch is barely readable, to chunky knit, where every stitch reads as its own element. It is the lever no other garment has.
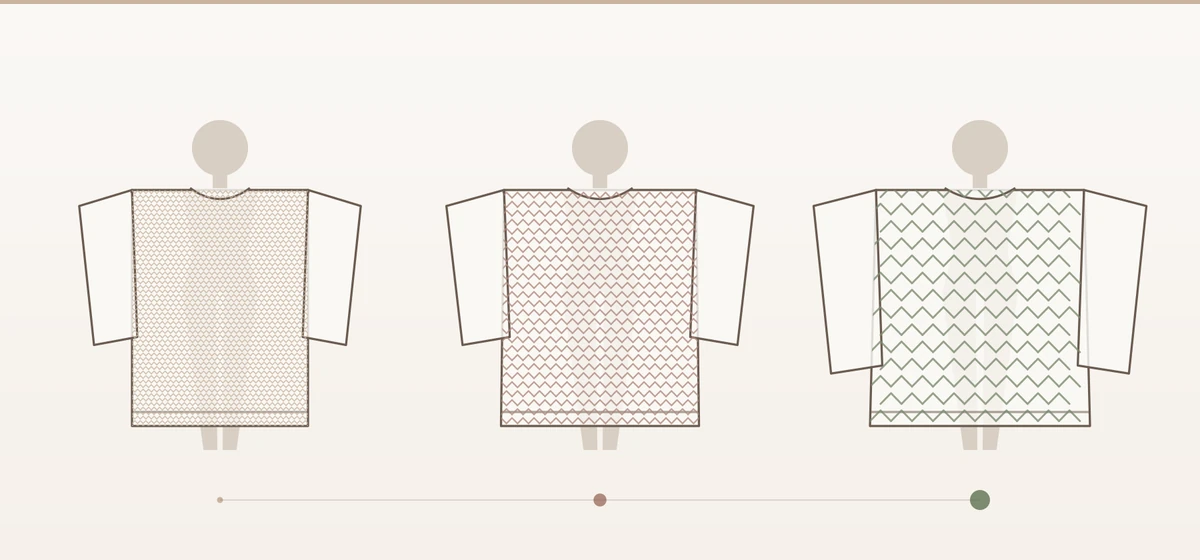
The connection the usual guides leave out: chunky knit brings visible mass of its own, and that mass competes with your bone structure. On delicate, narrow bones a thick cable knit overwrites the line underneath entirely — the jumper remains, the wearer disappears. With strong, broad bones the opposite happens: fine knit looks thin and arbitrary there, because it lacks the presence the body already brings.
In practice that means:
- Fine bone structure: fine to medium knit. Chunky knit only in small doses — as a short boxy jumper, not as a long oversized coat substitute.
- Medium bone structure: the full range, with medium knit sitting most reliably.
- Strong bone structure: medium to chunky knit. Very fine knit quickly reads here like a second skin with nothing to say.
Bone structure is not your weight and not your height. A good indicator is the wrist: encircle it with the thumb and middle finger of the other hand. If the fingers overlap clearly, the bone structure is on the fine side; if they just touch, medium; if they do not reach, on the strong side. How to place your proportions overall is covered in the guide to your body shape.
For layering the same logic applies again, sharpened — there several gauges add up to a volume budget, which the layering guide works through.
The shoulder seam: the strongest lever
The shoulder seam is the line where front and back are joined to the sleeve. Where it sits decides how wide your shoulder looks — and that effect is considerably larger than that of any neckline.
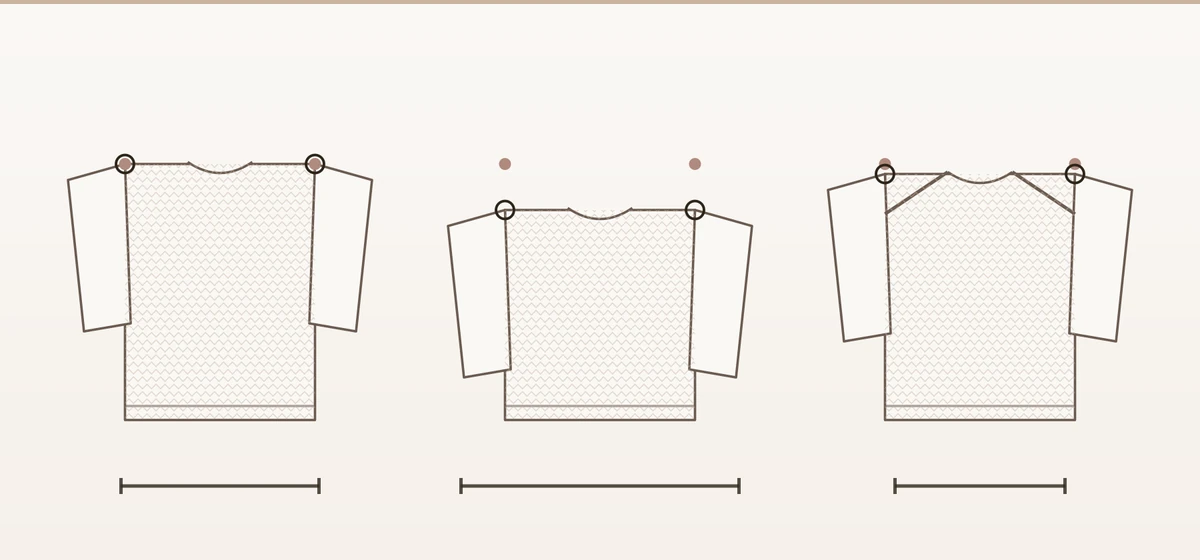
Three seam constructions appear on jumpers:
- Set-in sleeve. The seam ends on the shoulder edge. It marks your actual shoulder width and gives the upper body a clear boundary.
- Dropped shoulder. The seam slides onto the upper arm. That widens the shoulder visually and softens it — useful on narrow shoulders, rarely on already broad ones.
- Raglan. The seam runs diagonally from the underarm to the neckline. It dissolves the shoulder edge and rounds the outline.
The practical test: stand sideways at the mirror and place a finger on your shoulder bone. If the seam sits on it, you have a set-in sleeve in your size. If it sits two centimetres away, the jumper is cut too wide and is not deliberately a dropped shoulder — a difference you can spot in the shop and one that later explains every photograph.
A neckline changes where the eye goes. A shoulder seam changes how wide you are.
The hem lands on your widest point
The standard jumper ends on the hip. On most body shapes that is exactly the widest point — and a horizontal edge always emphasises whatever it lies on. This is not a design flaw but a consequence of standard lengths: ready-to-wear cuts for an average, not for your proportion.
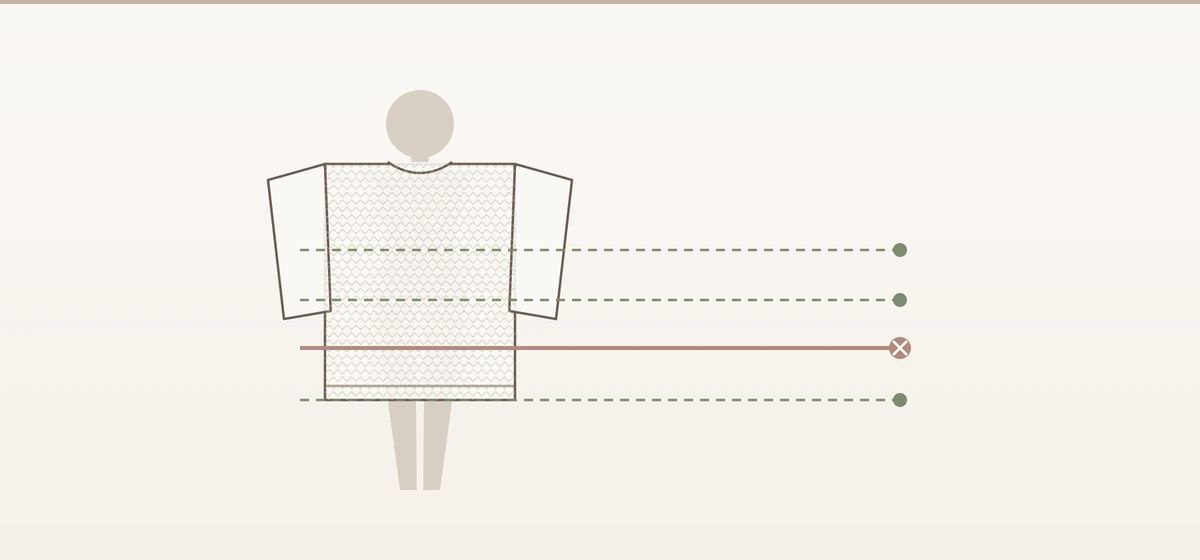
There are three usable landing points and one to avoid:
- At or just above the waist. The jumper ends above the hip and the leg line starts earlier. Works especially well with a high rise.
- On the high hip. Just below the waist, above the widest point. The most discreet and reliable point.
- Clearly below the hip. The hem sits on the thigh and the widest point stays unmarked. Requires length or a high rise underneath.
- Exactly on the widest hip point. This is the standard length — and the only point worth actively avoiding.
The simplest intervention costs nothing: tuck the jumper in at the front and leave it out at the back. That moves the visible edge from the hip to the waist without changing anything else. More levers of this kind are in the guide to looking slimmer through clothing.
Ribbing: the only structure
Ribbing is the tighter-knitted band at the hem, the cuffs and the neckline. It is the only component a jumper has for controlling width — and therefore the point where good fit separates from bad.
The rib tension determines the behaviour:
- Tight ribbing, wide body. The jumper blouses above the band. The width gathers exactly where the ribbing closes — usually on the hip.
- Soft or stretched ribbing. The jumper falls straight. Calmer, but without any waist.
- No ribbing, plain edge. The hem hangs free and the silhouette stays as wide as the cut.
The buying check: pull the hem ribbing open once and let go. If it snaps back immediately, the jumper will still sit after the third wash. If it stays stretched, that defined edge becomes a slack rim within months — and the waisted jumper becomes a sack. How to delay that is in the guide to washing and caring for clothes properly.
The jumper shapes at a glance
Only once material, shoulder and hem are settled is it worth looking at shape. These five cover most of the market.
| Shape | Feature | Effect | Suits |
|---|---|---|---|
| Straight jumper | Falls vertically from the shoulder | Calms without shaping | Almost everything; the safe choice |
| Waisted | Narrows towards the waist | Traces the middle | A defined waist |
| Boxy | Short and straight, wide shoulder | Shortens the top, lengthens the leg | A long torso, a high rise |
| Oversized | Deliberately too wide, dropped shoulder | Builds a silhouette of its own | Stronger bones, a narrow trouser |
| Longline | Ends on the thigh | Plays over the hip line | Long legs, leggings and slim trousers |
The most common buying error in this table is oversized on a fine bone structure. The shape builds a silhouette of its own — and the finer the bones, the less of the wearer stays visible beside it.
Necklines: what they actually do
The neckline is the shape of the neck opening. It directs the eye and changes perceived neck length — but it changes neither your shoulder width nor your volume. That is why it sits at the back here and not at the front.
- V-neck. Opens a vertical line, makes the neck look longer and the upper body narrower. The most reliable neckline.
- Crew neck. Neutral and calm. On a very short neck it can shorten the distance further.
- Boat neck. Runs horizontally from shoulder to shoulder and widens the shoulder line noticeably — helpful on narrow shoulders, critical on broad ones.
- Roll neck. Closes the line at the top. Requires either neck length or a counterweight further down, such as an open jacket.
- Funnel neck. The restrained roll neck; works better on a short neck.
The widespread rule that a V-neck lengthens is true, but it is the smallest of the levers discussed here. A V-neck rescues no chunky knit that brings two sizes too much mass.
Jumpers by body shape
Body shape describes how shoulder, waist and hip relate to each other. It mainly answers the hem and volume question.
- Narrow shoulder, wider hip. Volume and structure upwards: dropped shoulder, boat neck, lighter colour on top. Hem on the high hip or clearly below.
- Broad shoulder, narrower hip. Keep the top calm: set-in sleeve, V-neck, no shoulder detail. Width may sit below.
- Balanced with a defined waist. Waisted shapes and firm ribbing show the middle. Oversized only as a deliberate break.
- Straight silhouette without a strong waist. Do not cinch artificially. Straight shapes and longline jumpers work better here than waisted ones that suggest a waist which is not there.
- Rounder middle. Medium knit rather than chunky, straight drape, hem below the widest point. Firm ribbing exactly on the middle is the least favourable case.
Jumpers by body line
The body line is the bone structure — sharp and straight, soft and round, or mixed. It answers the material question that body shape leaves open. The system behind it is explained in the Kibbe guide.
- Sharp, straight line. Smooth stitch patterns, clean edges, set-in sleeve. Fine knit and fine ribs. Playful cable patterns read as foreign here.
- Soft, rounded line. Softly draping yarns, crew neck, light shaping. Stiff, boxy chunky shapes read as hard.
- Strong, broad line. Medium to chunky knit, relaxed shapes, dropped shoulder. Very fine knit reads as under-weighted.
- Fine, small line. Fine knit, short lengths, small patterns. Large cables and oversized shapes overwrite the line.
- Mixed line. Emphasise one element and keep the rest calm — chunky knit on top with a narrow trouser, but not a large pattern on top of that.
The fit check in 6 points
Together these six checks take under two minutes in the shop and replace most returns.
- Shoulder seam. On a set-in sleeve it ends on the shoulder bone. Anything else is either intention or the wrong size.
- Armhole. Raise both arms above your head. If the whole jumper rides up, the armhole is cut too tight.
- Hem height. Stand straight and look at where the edge lies. On the widest hip point: do not buy, or tuck it in deliberately.
- Rib recovery. Pull the hem ribbing open and release. If it does not snap back, the jumper will lose its shape.
- Stitch pattern against bone structure. Step back two paces. Do you see yourself first, or the jumper first?
- Transparency and weight. Hold the fabric to the light and lift the jumper. Very light fine knit shows every edge underneath.
The most common buying mistakes
One size up for more comfort. On a jumper without construction, the shoulder seam moves onto the upper arm and the hem moves down. More comfort turns into a different silhouette.
Oversized as a universal solution. Oversized is a shape decision, not a size decision. On a fine bone structure the wearer disappears inside it.
Chunky knit and wide trousers together. Two volumes add up. Chunky knit on top requires a narrow line below — the layering guide calls that the volume budget.
The neckline first. A perfect V-neck on a jumper with the wrong gauge remains a jumper with the wrong gauge.
Buying on colour instead of material. Colour decides whether the jumper suits you. The stitch pattern decides whether it flatters you — two different questions.
FAQ — Frequently asked questions
Which jumper makes you look slimmer?
A straight-falling jumper in medium knit whose hem does not end on the widest hip point. What matters is less the shape than the combination of a smooth stitch pattern and a hem above or below the widest point. A continuous colour across jumper, trousers and shoes lengthens the line further.
Does chunky knit work on a petite frame?
Yes, but in a short length and without additional volume underneath. A short boxy jumper in chunky knit with a high rise works well, because it shortens the upper body and lengthens the leg. A long oversized chunky knit over wide trousers, by contrast, tips the whole proportion.
Which neckline suits broad shoulders?
A V-neck, because it places a vertical line into the shoulder width. Boat necks that run horizontally from shoulder to shoulder emphasise the width and are best avoided. More important than the neckline on broad shoulders, however, is a set-in sleeve rather than a dropped shoulder.
How do I recognise a well-made knitted jumper?
By the rib recovery, the stitch density and the weight relative to the thickness. Good ribbing snaps straight back into its original shape; a dense stitch pattern lets no light through when held against a window. Very light chunky knit is usually knitted for volume, not for quality.
Roll neck or crew neck on a short neck?
Rather a funnel neck or a shallow V-neck. A full roll neck shortens the visible neck further, because it closes the distance between chin and shoulder. If it has to be a roll neck, an open blazer or jacket helps by placing a vertical line beside it.
What is the difference between fine knit and chunky knit?
Stitch density. Fine knit has many small stitches per area, lies flat and shows the body line underneath. Chunky knit has few large stitches, brings volume of its own and covers the line. Between the two sits medium knit, which fits most figures most reliably.
Should you tuck a jumper into the waistband?
Tucking in at the front and leaving it out at the back is the simplest way to move the visible hem edge from the hip to the waist. It works above all on straight and slightly wide shapes. With firm hem ribbing it often looks restless, because the ribbing bulks under the waistband.
Which jumper length suits a long torso?
A short to waist-length shape, so the upper body is visually shortened and the leg lengthened. The boxy shape is the obvious choice here, ideally with a high-rise trouser. Longline jumpers reinforce exactly the proportion that already dominates on a long torso.
How much ease does a jumper need under a jacket?
Enough that the closed jacket pulls no horizontal folds and the arm lifts freely. In practice that means fine knit under close-fitting jackets, and medium knit only under jackets cut for it. A chunky knit jumper requires a jacket cut one size wider.